Recently I had the much overdue experience of writing my first Lightning Web Component for my day job. While I’ve gone through some Trailhead modules and built a couple on my own for demos, there’s something special about being able to deliver a component that other people will end up seeing and using. While I can’t share the specifics of my company’s processes, I wanted to share some thoughts and feelings on my experiences as well as some tips as to how you can start writing your own!
Starting Out
I’ve been developing in Apex for over 5 years now, and did some Java before that. I think it’s true what they say that “JavaScript is to Java as carpet is to car”. There’s definitely a learning curve there, even coming from Aura development, which has a touch of some JavaScript functionality but primarily uses JSON with some light JS mixed in.
As with any new type of coding, I think it’s always helpful to start with some sort of design followed by pseudocode. For the design, a co-worker of mine had already come up with what the final result should look like, so I just had to figure out how to break it down into individual components.
Similar to the approach I normally take to writing Apex, I start by writing pseudocode and then generally just put everything into one method, or in this case one component. My component involved 1 screen that needed to have 3 different sections, of which only 1 would be expanded and the other 2 collapsed at any one time. Since there would be 3 separate sections within the 1 large page, that told me I’d need 3 child components and 1 parent component.

Tools
Salesforce has invested heavily in VS code and with good reason, it’s a very powerful software development tool. Salesforce has developed many custom extensions to assist your development with the tool as well. If you haven’t already, check out this Trailhead module to get started!
While I knew that I’d need to start calling Apex eventually to bring in data, I wanted to get a working component first with just some hard coded dummy data. I also knew that I’d need to be able to call some sort of event for the child components to talk to the parent components to figure out which components should be expanded or collapsed. CSS is also critical here to make sure that components and their parts are in the right spot and the right color.
While I can go for long periods of time writing Apex before syncing it to my org, it’s harder with UI development since minor tweaks are often frequent to be able to check events and CSS attributes. While you can play around in the Chrome Developer console to edit certain attributes, I personally like playing around with the different SLDS classes before I start creating my own CSS.
Salesforce to the rescue once again, using the newly announced LWC Local Development! It was pretty easy to set up and automatically updated immediately without me having to wait 10-20s to push to my org to view each change. I highly recommend this for making quick UI changes and checking event propagation. I moved away from this once I started working with Apex, since my local computer wouldn’t have access to my org’s data, but up until that point, it massively cut down on my development time.

Events
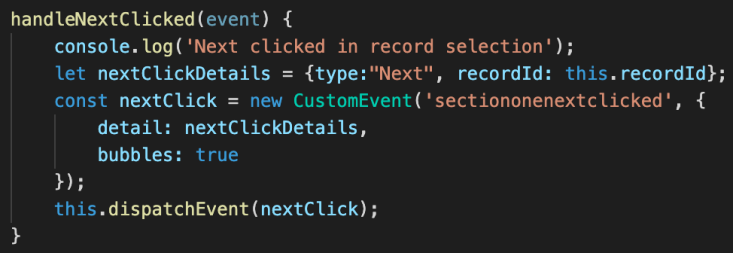
I’d had some experience dealing with events in Aura, creating custom Lightning Events and then firing them from the child components via aura:registerEvent and then listening for it on the parent component via aura:handleEvent. On LWC however, event propagation works differently and depending on what you’re trying to do, there are several different approaches. They primarily involve creating custom events and custom event handlers whose names need to match the name of the event (i.e. if you create a custom event called notify, you’ll need a parameter for onnotify similar to how you’d have onclick or onchange. I found this documentation on events and this sample code base tremendously helpful! In general, the Sample Gallery has a lot of great examples whose code you can use and customize for your own needs! LWC also uses “kabob case”, stylized-using-dashes, to reference child components, even when your child component’s name uses camelCase.
Child component (sectionOneComponent) sending custom event called “section one next clicked”:

Parent component calling an action on the “section one next clicked” event that was fired from sectionOneComponent:

Component Parts
Once I figured out the event propagation, I needed to actually populate my components with various sub parts. Similar to Aura, this is where Base Components came in to give me an existing card, combo-box (picklist), buttons, and allowed me to lay things out in an organized manner using the layout and layout item components. Using the “Open in Playground” functionality from the Component library gave me another way to play around with different combinations before having to deploy it to my org.
Apex
Once I had the layouts more or less in place, I started deploying to my org and connecting to Apex. By utilizing decorators and events to respond when users changed values from my hard-coded dummy data, I had confidence that once I wired up the Apex, I would have a very short turn-around time to get the real data.
Once again, I went back to the Sample Gallery and documentation for some examples. While I decided to keep everything in a single Apex class for my series of components, knowing that I could add additional Apex controllers to my single LWC gave me peace of mind if I wanted to separate functionality. I had to modify my events a little bit to send data from one child component, up to the parent, and then back down to the other child component, but other than that it was relatively straightforward! I also found out that you can create a custom structure that you can assign to the detail attribute in the event to send multiple parameters to your parent components at the same time. Also ran into some issues with camelCase vs kabob-case again, but I’m guessing that will get better with experience.
Child Component One JS:


Parent component JS:


Parent component HTML:

Child Component Two JS:

Conclusion
While I still definitely have a lot more to learn about JavaScript and Lightning Web Component development, I was excited that I was able to turn these components around in just a few days! All of my HTML and JS files across my components only have 40-50 lines of code each. I still have a bunch of SLDS and other CSS changes to add before this is ready for production but I’m excited to build off of this and am looking forward to developing more LWC in the future. If you’re interested in learning more about how to make the switch from Apex to LWC, check out my session on May 16th at Virtual Dreamin!


Leave a comment